Thursday, July 24, 2014

More Stencils!


So, since I started back to work this week I haven't had time to create like I wanted, but once we get into a routine it will be easier to carve out the time.

So, while browsing around in the stencil section at Joann (not in the papercraft section, back in the paint section) I happened on this pack of Plaid brand, "simply stencils".


I was so excited! It was just under or around 4 dollars for 3 sheets of 8 x 10 stencil material! WOOT! The possibilities are endless! I am all for cheap and easy! Let me tell you what!

I decided for this purpose to just use my dies from the Spellbinders Media Mixage (said, mix AH ge): the fleur de lis to be more specific. So, here is a quick video showing you how to make the proper sandwich for your cuttlebug. 

Also, here is a link to the metal shim on Amazon.com.

Once the video was done I played around some more using some arrow dies from the new Spellbinders line, Inspire, as well as hearts from the Mixage line. Basically just a nice sampling.

Then I used a couple colors of acrylic paint and some Heidi Swapp color shine. 


This was super fun and I can't wait to use my cricut to create more stencils and then I will be SURE to share any projects with you, of course! Be inspired, and happy crafting!

Sunday, July 20, 2014

Fabulous Fairies

I discovered another stamp company this week and went ahead and bought a couple to play with. They were so fun to color! Aurora Wings. Check them out!

I am also entering this card into the Sprite Challenge over at the challenge blog for Aurora Wings!! http://aurorawingschallenge.blogspot.com/2014/07/challenge-5-sprite-delight.html#  Be sure to go join, and there is a bonus free image for participating as well! I can't wait to color it up!!

This one in particular is so delightful! I seriously couldn't wait to color her up! I used my copic markers to color her and then popped out the flower she is holding to add more dimension.

So, here is what I created with her! I used paper from Glitz, "Finnley" by Traci Smith. Also used a page from the Daily DIY double sided journaling cards from We R Memory keepers. The frame is from Jilli Bean soup. The stars are from Studio Calico. The other trimmings are Jilli Bean Soup as well as scotch washi tape.


I also colored another image. Love this fairy so much! I colored her using a new-to-me color scheme. I might be in love!! 

So, that's it for now! I hope that you enjoy these and are in some way inspired to get going on a project for yourself! Even if its just coloring!


Saturday, July 19, 2014

Sometimes You Win, Sometimes You Lose

So, I think I might have been pushing myself too hard since I have actually had time the last week or so. Sometimes, even when you want to craft, that doesn't mean you should push yourself too hard. I have been so obsessed with the idea of art journaling and after how much I LOVED my yellow flower and butterfly I tried again.

This time? It was meh. Not great, but not terrible. Just....meh. Maybe I am too much of a critic. On this page I just tried too many ideas all at the same time with no aim or goal in mind.

I did love the color combo and I liked the different techniques, they just maybe didn't all need to be on the same page, and the flower was a muddy mess compared to the previous day. I apologize for the photo too.


On THAT note, I did manage to make another video. This time, a quick DIY. A CHEAP way to make some stencils for all of your misting needs. It was fun, quick...and did I mention CHEAP? I will be making a lot more of these!


So, I hope you have the chance to get crafty today! Happy weekend!

Thursday, July 17, 2014

Field Notes

So today, I decided to finally take Noah down to the nature area at Edwin Warner park in Nashville. He loved going there on a field trip last year and has begged and begged to go back. Since that strange cool front came through this week it was the perfect time.

It was GORGEOUS out there and all of the wild flowers were in full bloom. Huge June bugs, bumble bees, dragon flies and butterflies were out in full force.

We were in heaven! Noah was a trooper and we hiked all over, stopped and too pictures and sketched...it was the dream day out doors. No rush, no fuss, no whining (HALLELUJAH!).

So, among the tons of photos that I took I was really inspired to get painting with these two when I got home.


I got out my paints, gesso'd a page and got to work! I haven't really painted since I was a kid. Don't really consider myself a painter, but lately all I want to do is paint!

 All I used is walmart acrylic paint and cheap different sized paint brushes. Oh, and fingers. Lots of finger painting. How else was the background going to happen??
I seriously can't believe that came out of me. Like, seriously. Musta been some kinda craziness happenin!!

So, I got out my Balzer Designs stencil and a couple of other texture things I have laying around, used some Heidi Swapp gold mist and some circles created with paint and the bottom of the mist bottle. Got out my white paint pen and went crazy with some dots, journaled and this was the result.

Just a close up of the flower and butterfly with all of the shine and dots. 
I can't wait to see what else might be lurking in the back of my artistic side! I did go through a few renditions of the background. You can see the horrid black smudge with dots above....it got painted over in lieu of a more open airy feel.

Hope you are inspired! 

Wednesday, July 16, 2014

Finger Painting


So, I think I told you all about how inspiring Dina Wakely is and how excited I have been to get more into mixed media and the like.

Today, I was reminded, that Dina I am not. However, i learned a lot from the experience and I will keep this page to remind me of those things.

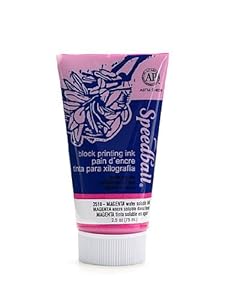
So, the first thing I did was use this electric pink paint I wanted to try that was on clearance at Hobby Lobby (no hate letters, please. I KNOW they are doing controversial things, however they are the ONLY store that carries what I use...so...there it is).

This paint is actually block printing ink. Its thick, and when I say thick, I mean like....almost gelatinous. The color, however, is FANTASTIC!

At first, I tried to spread it with my brush, but very quickly realized my fingers were going to be my best bet. FINGER PAINTING!!!!! After I finger painted, I kind of let it dry for just a bit to see what else I wanted to do. I had no plan at this point other than PINK. 

I decided to see what would happen if I used a stamp that I carved from an eraser and stamped it (bare, no ink) into the partially dry paint. The result was this fun pattern/texture! The sideways triangle/chevron-like pattern all over the page. I also dripped and spritzed some of my tattered angels chalkboard mist all over. 


STILL had no plan at this point. There was so much pink it was almost burning my eyes! lol SAVE me from the PINK! After that, I just winged it. Target had some bright colored tags with a boston terrier on them in their clearance section a long time ago and I thought he would be the perfect addition. Not really sure why. 
After that? I was stumped. I think I have over-created this week. The creative juices have run dry and my brain is fried. I used my star stencil and some more Studio G chalk based pigment ink and went crazy, and then again with the Heidi Swapp gold mist. I pooled it up and let it run down the page. 

Again I was stumped. What is wrong with my brain?!?! (AGAIN, no nasty notes. I KNOW already, lol). Then I remembered that fantastic Dr. Seuss quote, "Today you are you, that is truer than true. There is no one alive who is youer than you." It was PERFECT!!! 

After that it all started to flow. I found a camera by Uprintables by Rebecca and slapped that puppy on, used some of my fun cosmo cricket phrases and got out another of my home made chevron stamps and stamped with black paint and added black micro-glitter. For final touches the paint pen came in handy. 


It wasn't at all what I have envisioned, and in the end I made a lot of mistakes based off of not really thinking through to the end result. You should note that if paint is not 100% dry, mod podge will smear that color everywhere and result in a muddied mess. Also, with this paint, too much mod podge takes you right back to the base color white. Peels the stuff right off. Also, for some reason painters pens splurt? Like so the white splotches are from that. I just shook the pen and there it went. NUTS. And, lastly. Only put glitter where you want it cause when stuff is a tacky muddled mess, it will stay where its put. ::sigh:: 

HOWEVER. I really do like mostly the outcome and am keeping it to remind me of all of those things that I learned as well as the pleasant surprises you can learn when you just try something new. 

So, here is to learning and growing! CHEERS!

Tuesday, July 15, 2014

Yarrrr.....

The other day I posted an image from Saturated Canary that I colored. I loved coloring her. Today, I attached her to a card. I am considering submitting it to be published. I have never been brave enough, but the talented Steph talked me into trying, so try I will!

Here she is, all gussied up. I actually made a matching envelope as well. I used Heidi Swapp color shine, gold. For the burst of blue behind her I also used color shine, but the teal. I love LOVE her mists. Omgoodness, Imma go broke at this point.
The cork stars are from Jilli Bean Soup. LOVE them. The frame is also. Did you know Walmart is selling Jilli Bean Soup? For totes awesome. Oh, and the words, "hello friend" are from Cosmo Cricket. The papers are Teresa Collins, "Tell Your Story" and Studio Calico, "Hey Day".

I had so much fun with this image. I tried to make sure that she was the focal point of the card, so I didn't add too much distraction around her.

Hope you are inspired! Go, and GET CRAFTY!

Monday, July 14, 2014

And, now...Presenting.....

I am SO GLAD to finally let the cat out of the bag!! I just can't stand it!


So, I got asked to be on the Southern Girls Challenge design team! I got picked to be on team Lou and seriously can't wait to get started and show you all how fun this blog is! There is so much inspiration, and so much variety! Seriously, something for everyone.

Why don't you check out the current challenge, "Spin Me Round and Round". Two sponsors too!

.

-

Be sure to check them out. The first challenge for the new team will be September the 4th, so be sure to tune in. My team's challenge will debut on September 25th.

Be sure to check it out, and stay tuned for more awesome! Going to be a great 8 months!


Sunday, July 13, 2014

Getting In Touch With Your Artistic Side

A
So, this weekend I got to have a quick hang out with my buddy Kristy. She has been telling me to check out Dina Wakley for days and I finally took the opportunity to check her out. HOW have I not heard of this person before now? I am completely obsessed. Her style of crafting matches so closely with my heart and my own tendencies. I have a feeling I will be stalking her facebook and youtube channel often.

So after checking her out today I was so inspired that I drug out my paints and my brushes and got to work.

This was the result:


I used a lot of "freestylin" and used what I had. Nothing too fancy. The acrylic paints were from Walmart, and I happened to already have gesso, so I used that to prep my page. It really DID make a difference. The purple ink I used is Studio G. The mist is Hedi Swapp. I used 2 different stencils: 1 from Tim Holtz, and one that I am not sure of the brand, but I love it. I also used an arrow/chevron stamp that I made from an eraser. 

I created some texture paste with this tutorial I found on pinterest, and I have a feeling I will be making a lot more and using it a LOT! Here is a close up of how it looks on my Tiddly Inks image: 

I had so much fun creating this and I can't wait to make more! I went ahead and journaled a bit on the page because after I looked at it it felt a bit empty. 

I find that I will need to get a really good pen to write over acrylic paint, but that is an easy remedy. 
I hope that you are as inspired as I was! Oh! And I also had a chance to color today! WOO! Colored this Saturated Canary image using my new copic. I love R24 (Prawn). LOVE that marker! Now, to create something with her!

Saturday, July 12, 2014

Crafty Space Tour

So, I kinda have a hard time with my crafting space. I am super thankful for it, however, sometimes I wish it was an actual craft room where things didn't have to be in crates and totes. And then I remember that I used to craft out of a small under stair closet and my living room floor. I have come a long way, baby!

So, I decided that I would give you a "tour" of where the magic happens.

Here is a quick video. I was interrupted so cut it kind of short, but so is life as a wife and mom and I wouldn't have it any other way.


So here is the view from my hallway. I really like the french doors. I can pull up the shades and get good light in the early afternoon. Helps since I swear I am going blind. My husband makes fun of me because I need so much light all of the time. Note the extra double lamp as well.
 The dresser I got off the side of the road in my neighborhood. Back when I would run almost every day I ran by this house and it was at the side of the road, covered in spider webs and dirt and grossness. I shudder to think what was on it. I asked the guy if I could have it and he said, of course! I was so stoked that I cut my run short and went back home and got my husband and my van and brought it home. I bleached it and scrubbed it and now I have an awesome storage unit.

The box on top is from Hobby Lobby and is made to hold the cricut and/or silhouette or whatever die-cutting machine you may have. This one houses my cricut, my cuddlebug, and my cartridges.
On the top left, you see that lunchbox? Here are my copics. Every copic I own fits perfectly in this box and I love that I can store them flat. It is death to a copic to store it upright, in my opinion. 
 So the top drawer of my dresser houses my Smash*books. Most of them woefully incomplete, but that's okay. Each in its own time. (incidentally, see that card on the top by the ponies? My son made that for his best friend for when she returns from her family vacation.)
 This next drawer I used to house my design team stuff, but I am done with that team so it will go through a makeover. For now, though, scrap paper and 6 x 6 pads of paper, a box of precut cards and envelopes, design team stamps and other items live in this drawer.
 THIS drawer holds my WASHI tape! I really love the plastic containers I found at walmart. I can't find a photo online, but they are clear, flat containers with different shaped sections in them. I will try to take one out and photograph it another time, but I kinda love em.
So THIS came from Lowes, and its awesome. I am so lucky. My hubbs bought this for me last year for our wedding anniversary. I love it. Its so great for so many of my fun crafting supplies.  
 I keep my memento inks and embossing powders and stickles and the like in this drawer. I like that when I open it I can see everything. I find that if I can't readily see my items I am not inspired to use them as often which results in needless spending.
 This next drawer I have my larger ink pads organized by color as well as my copic refulls, mists and watercolor crayons and pastels. again, all where I can easily access them.
 The last drawer is about to undergo some work, as is the top portion of this storage unit which I am not showing you because it is just a random mess of items that need to be put into the correct place. Anyway, this drawer is for my thickers and letter stickers. They are in folders, but its not a perfect system, so soon I will revise it.
I hope this shows you how you can use whatever you have. My dining room is shared with myself, my son and husband, our cat and dog as well as it is being used for storage currently (did you see the pink sheet covering the totes?) However, it all works and is accessible. I know it won't always be this way. Someday we will move on and move into our final home and have all the space we want/need, but for now I will be thankful for my little space. 
Friday, July 11, 2014

Puppetry 101

So the last few months my son has been obsessed with Jim Henson and all things puppetry. I think its awesome, but I know so little about how to make puppets so I wasn't sure how to indulge him.

Kellie over at "Give A Girl A Blog" posted an adorable project for a pom pom puppet and we had to try it out. It was a fun Instructables tutorial.

So, as adorable as it was, I found that because hot glue was used, my son wasn't able to really participate (and for good reason...I am now missing 2 fingerprints.....).

However, it was friggen adorable when done.


So next, I wanted to do something Noah could actually make. That was the point of our craft time together. I had also seen this tutorial on pinterest, so we got to work. 

Noah decided that he wanted to make a tiger with 4 legs, so we did just that. When it came time for me to make it into a puppet, though, it became clear very quickly that the tutorial didn't account for a body with the strings. So, for now, we will just play with him as a toy and figure out how best to make him a marionette. 

I had Noah draw a tiger face and cover the toilet paper tube in construction paper. He used fuzzy pipe cleaners to create the stripes on his back and we used pom poms and washers for his feet.

Noah loved him so much that he wanted to brush his teeth before bed. So cute. 

It was fun to get back to crafting with Noah again. Hope you are inspired to get crafting with your little munchkin too. 


Saturday, July 5, 2014

Scrappy Fourth!

Yesterday a scrappy friend of mine came over before the fireworks and we played and crafted together for a few hours. I have been wanting to craft, but the mojo just wasn't happening after all my brain has been through this week.

However, I really wanted to get our strawberry picking pictures scrapped. So, as we chatted and played with dies and my prima paperdoll this is what finally fell together, and I am super happy with the outcome.


The papers I used are from the "from me to you" stack from Pebbles. I love this stack. Actually, the background wood grain is from The Paper Sudio, but the rest is pebbles. The words are from Tim Holtz and the journal card is from We R Memory Keepers, "Daily DIY" journaling cards stack. Lastly, the bling is sparklets from Kaiser Kraft. 

I actually had these photos printed with "Groove Book". I love getting all my  mobile photos printed this way. 2.99 a month for 100 photos. Its pretty much amazing. You should check them out. 

Anyway, I hope that everyone had a wonderful 4th of July here in the states and I hope you get crafty this weekend! 

Tuesday, July 1, 2014

Be Amazing

So, lately I have needed a little crafty release, so today I took my chance before I go back to craziness this summer.

I bought this Prima Doll stamp back at Christmas in Gatlinburg and have been terrified to use it for fear I won't live up to the amazing that Prima Doll stamps are.

This weekend I was blessed to meet up with the amazingly talented Steph Ackerman (check out her blog....) and she really opened a brand new world of crafting up to me and I have been so inspired that I seriously can't stand it!

So today I pulled out my lovely stamp and with no expectation and no stress, created a wall hanging. I used Ghesso, Mod Podge, glitter, Memento inks, sequin ribbon, feathers from my yard and a dictionary page to create this. I glued it all down to a piece of chip board that I had laying around because I didn't want to create an entire canvas. 


This piece was so freeing and I had a lot of fun creating it. I hope that it inspires you as well. Happy crafting!