
BOY was I a grump yesterday. No reason. Just grouchy. So, what do I do when I get to this point? I craft. It seriously IS therapy, as silly as that sounds to some. Not many things can compare with creating something useful and adorable. ;)
So, yesterday, after spending a lot of time on the internet looking for a tutorial for a non-zippered earbud case I decided to just use embroidery thread instead to prevent tangling. I have seen that all over pinterest. So far, the verdict is good. I did decide to leave the top part of the earbuds free of thread because the thread stiffens up the cord and I like my wires to lay down. Its just preference. It can be done either way.

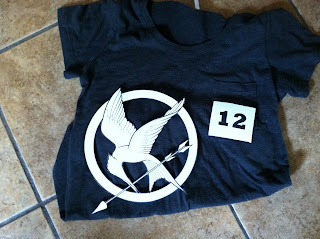
Woke up to thunder early in the morning this morning, so when DH got up I went out to the local Goodwill (though, I am STILL mad at them) and got myself a charcoal shirt to bleach. I have been wanting to create another hunger games shirt that is a little better than my last attempt at making one...since I have until November until the next installment comes to theaters, I thought I would get a head start...last time I waited until the day of...and you could tell. Hahaha.
SO, I found an image on google of the mocking jay symbol and printed it 8.5 x 11 and then fussy cut it out with my EK Success scissors...which are identical to cutter bees? ANYwho. I also created a number 12 and cut it out.
My intention was to have the 12 on the pocket, and the symbol on the back. I tried using a clorox bleach gel pen and it ended in disaster. The bleach bled through the paper and onto the pocket, forcing me to remove the pocket before the shirt was entirely ruined. Lesson learned.
Plan B, led me to use the symbol on the front, which, I will admit, I like much better. I didn't think I would. Who knew? Haha.
 DH has this amazing Elmer's Spray Adhesive that I used to spray the back-side of the symbol. Set the timer for 5 minutes and its perfect tacky removable adhesive that does not leave residue on the shirt! Another tip is to use wax paper so that your spray over doesn't get on anything.


So, yesterday, after spending a lot of time on the internet looking for a tutorial for a non-zippered earbud case I decided to just use embroidery thread instead to prevent tangling. I have seen that all over pinterest. So far, the verdict is good. I did decide to leave the top part of the earbuds free of thread because the thread stiffens up the cord and I like my wires to lay down. Its just preference. It can be done either way.

Yes, that IS a TARDIS on my computer. And YES, my computer IS bigger on the inside. Thanks for asking!
SO, I found an image on google of the mocking jay symbol and printed it 8.5 x 11 and then fussy cut it out with my EK Success scissors...which are identical to cutter bees? ANYwho. I also created a number 12 and cut it out.
My intention was to have the 12 on the pocket, and the symbol on the back. I tried using a clorox bleach gel pen and it ended in disaster. The bleach bled through the paper and onto the pocket, forcing me to remove the pocket before the shirt was entirely ruined. Lesson learned.
Plan B, led me to use the symbol on the front, which, I will admit, I like much better. I didn't think I would. Who knew? Haha.


I used a giant shipping box to protect the back of the shirt from the bleach. I applied the symbol to the shirt being sure that I pressed down all of the edges so that bleach would be less likely to bleed. Do you like my "helper"? Don't worry. I removed him before spraying. Our neighbor cat lives here more than he does at home! He's a sweet thing. Anyone looking for a cat?

I bunched up the fabric in a few places to add more interest to the shirt. I sprayed lightly, and was sure to get around the image best, and fade out as I sprayed away. I waited until I could see where it had been sprayed, applied more in a couple of places, added some drips and then removed the mask before the bleach could seep through and ruin the image.

Voila! I have to say, I like my shirt better than the ones they sell. I don't say that often, but this one did me proud. YAY! Now I have to make sure I
A: Still fit into it and
B: Don't let anything dastardly happen to it
B: Don't let anything dastardly happen to it
before November comes!!! Haha!
Hope you enjoyed and hope this inspires you to make a shirt or jacket of your own!
Omg I love it!!!!!!
ReplyDeleteOmg I love it!!!!!!
ReplyDelete