Showing posts with label Copic Markers. Show all posts

Wednesday, August 9, 2017

SDC 279 Animals Only!

So, I am always haunting the clearance aisle, as a thrifty crafter, and this last week I found this amazing Heidi Swapp Instalove photo holder and it was so cheap that I just had to have it. I knew it was destined for Stampotique. My thought behind it was that it could be used to hold ATCs and display them.

So, on to the challenge at hand. Use ANIMALS. Well.....I feel like unicorns are for sure animals.
Yes, ...my geek is showing. Ask me if I care....10 points if you can name this book. (yes, movie too)

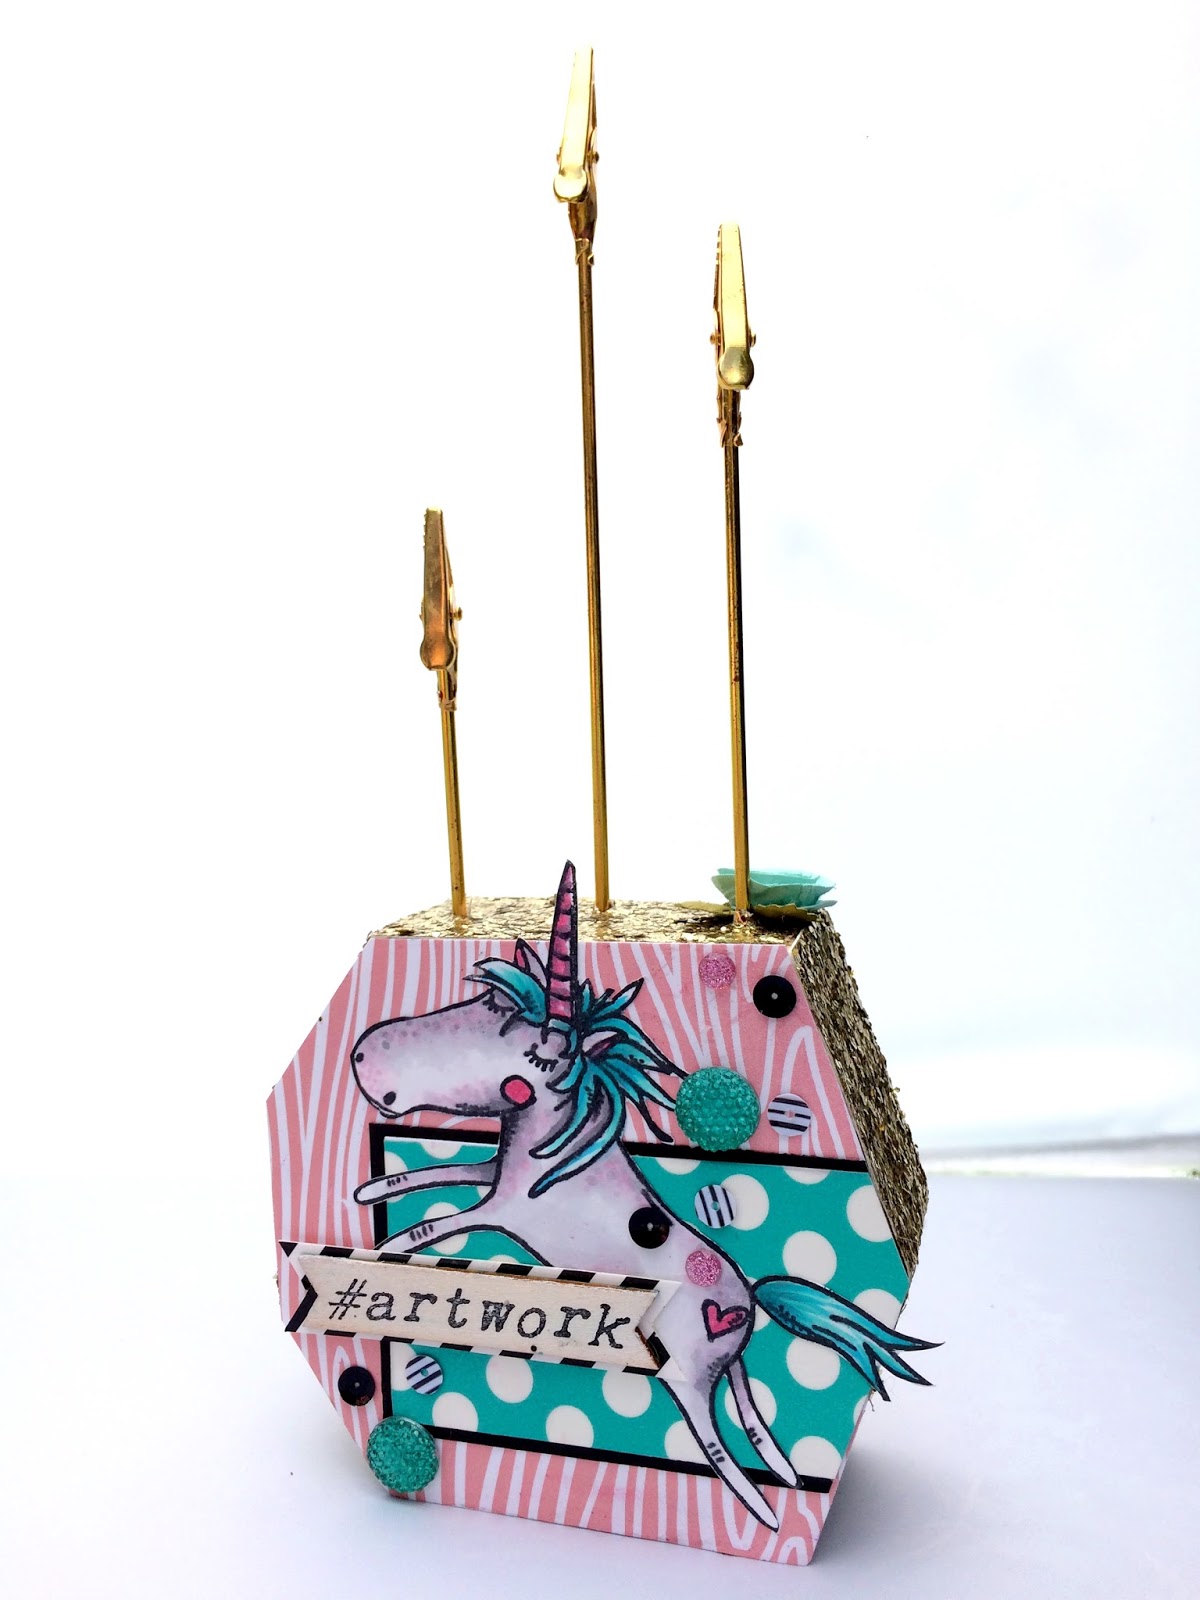
ANYhow. So I colored up our adorable unicorn with copic markers. I must get back into the habit of using copic markers. It is so fun to color and watch an image come to life.  I also used one of our new hashtag sentiments. I stamped #artwork onto a gesso treated veneer. Some fun papers,  washi tape and, of course, BLING...
I even had some amazing GOLD glitter flaked paper that was perfect for the edging. My Tombow adhesive is amazing for stuff like this! Take note! It...is....AWESOME! Oh, and a sweet paper flower.
See how perfect this is for holding ATCs?? It would be a great project for those of you that love ATC swapping as much as I do! Someday I will post a video if my amazing year of swapping!
Alright! I hope this inspires you to get creating with all of your amazing animal stamps and papers and things! Be sure to check out what the rest of the design team has created and be sure to link up when you get your projects done!

INGREDIENTS:

Unicorn: Stampotique
#artwork: Stampotique
Heidi Swapp Instalove Tall Photo Display
Some Odd Girl Designer Paper
Heidi Swapp Washi Tape
Glitter Paper
Copic Markers
Tombow Glue
Color Box Black Ink
Various Bling

Wednesday, June 21, 2017

SDC 276 Stencil It!

This month Stampotique is collaborating with Eileen Hull. We were given some very wonderful die cuts to play with, not the least of which was this wonderful Passport Book cut. I admit, I was a bit perplexed at first as, I have never bound a book in my life. It was for certain a learning curve, but in the end I am pleased with the results.
I decided to create a recipe book/journal. I used one of our new release images from Daniel Torrente at Stampotique. Don't you just love this adorable stove?? It has myriad possibilities.
I used several stencils on this book and I love how each page turned out. The words were created using our Alphabet Background. I stamped the background and then cut each stamped letter out to create each word. I regret that my ink was running low, but I kind of like the distressed look.
For the first two pages I, of course, used stencils, also an envelope and more stamps. I used Tera Callihan's Cupcake Girl from Stampotique and more words from my alpha stamping. I love how the cupcake girl pops off of the stenciled background.
So for this page, of course, more stenciling as well as Stampotique's cupcake (from Terri Richardson). How much more perfect could a cupcake be for a food book? Especially one this scrumptious! See the tab here and the latch and label on the book? Those also came with the journal from Eileen.
I like how happy and cheerful the book is. .Would make me want to cook! And I am not that good of a cook, haha. Just ask my little boy! ;)

Be sure to check out the rest of the design team as well. Lots of beautiful work to be sure! Also, make sure you join our Facebook page in order to see much more inspiration as well as ATC swaps monthly! 

Ingredients:
Eileen Hull Passport Book Die Cuts
Copic Markers
Dylusions Keyholes Small Stencil
Balzar Designs Mini Numbers Stencil
Faber Castell Arrows Stencil
Heidi Swapp Triangles Stencil
Dina Wakely Acrylic Paint
Lindy's Spray Ink
Color Box Black Ink
Pom Pom Trim (target)


Saturday, May 6, 2017

Word Up Weekend!

So, this week my word up weekend post is a bit more serious. Sympathy cards are not something we like to think about having a need for, but it IS something that is needed. I am, however, still just outside the box enough to not use calm colors I WILL be creating something more calm but not this time.

In the past when someone close to me passed away I really felt like the endless parade of bland cards, while sweet and thoughtful, were just as depressing as the thing I was going through. That is why I used bright colors for this card. While we know that someone you care about passing on is an incredibly sad thing, a bright spot in your day while grieving can mean the world.

So, out came the copics. It took a few tries to get the look I was going for. Too long with no practice! I MUST put that on my list of things to do this year. COLOR with my COPICS more!
In the end, I used one of my Dylusions backgrounds I really loved the purple with the yellow and how it set off the wing circle. Did I mention that this sentiment circle is from our latest May release? The wing AND the sentiment come together. 2 for 1? Yes!!
I figured that the stamps needed to speak for themselves so I tried to keep the card simple over-all. I hope against hope that I will never need to use this card, but if the time does come when this card is needed, I hope that the person receiving it will enjoy the bright spot in their day.

Ingredients:
Sympathy Circle: Stampotique
Dylusions Ink Sprays
Color Box Ink
Copic Markers
Bakers Twine
Adhesive Gems

Wednesday, April 19, 2017

SDC 271 Bling It On

Oh, dear. I think we all know how I feel about bling. This challenge was for sure, for me. We recently had a new release and one of my favorite stamps was this cupcake girl. It made for the perfect birthday card!

I colored her with my copic markers. She is a dream to color and I love her little buck teeth. I used as many kinds of bling as would fit onto this card to make it bling-y.

Be sure to check out the rest of the team (on the left-hand side of my blog) So much inspiration to be seen!! Thanks for stopping by!

Ingredients:

Cupcake Girl: Stampotique
Studio Calico Atlantic Collection Paper
Paper Studio Paper Frame
Kaiser Craft Sparklets
Adhesive Gems and Studs
Twine
Copic Markers
Color Box Black Ink

Thursday, January 19, 2017

I Wanna Hippopotamus For Christmas

So recently, my husband met a fellow maker and hit it off and he was so excited to show me some of her artwork.  I was instantly in love, of course with her "Doodles of a Fluffy Nature". In particular, this hippo. Seriously. How flipping sweet is this face?


After coloring her with my copics for the first time in...well, it is embarrassing to say how long, I decided I needed to create a sweet card with her. I love how it all came together. Love the subtle colors and the sprinkling of bling....even brought out the spellbinders and the cuddle bug! WHAAAT?! IKR...its been ages since I have created a card like this....and it was so much fun!
(It is difficult to get a good photo today because of the dreary weather)

So, basically, you need to go and check out Erin Fezell and her amazing artwork...including 3-D printed jewelry! Srsly! DO IT! DO IT NOW!!!

Ingredients:

Sentiment by Tim Holtz Ideology
Authentique Paper
Crate Paper
Copic Markers
Spellbinders Circle Die
Spellbinders Scallop Die

Tuesday, November 1, 2016

ATC! Approach With Caution!

OKay, I am back! With more ATCs! Seriously, I never realized how therapeutic creating an ATC could be. When you don't have a lot of time but really have the itch to create, these little cards are just about perfect. 

I love this cactus stamp from Stampotique and had a lot of fun envisioning a sunset, desert sky for the background.

The background orange and pinks were created with dylusions sprays. Love how the colors gradated. The sunburst is a Tim Holtz stencil (rays) that I just love and use quite a bit, with Dina Wakely heavy body acrylic paint and I love how the paint just sticks in place and shows all of the details of the stencil.
 I colored the cactus with my copic markers. I am having fun getting reacquainted with them. I have been using watercolor pencils quite a bit and have really started missing my copics. I mixed the copics with a Prima marker, which, surprisingly I love almost as much as my copic markers. They blend very well!
Annnnd, of course, when around cacti in the desert PLEASE approach with caution. ;) 

Ingredients:

Prickly Pear Cactus (Stampotique)
Approach With Caution (Stampotique)
Tim Holtz Rays Stencil
Dina Wakely Acrylic Paint
Copic Markers
Ranger Black Archival Ink

Saturday, October 1, 2016

ATC DIY Stamping!

Do you ever look at your mixed media projects and wish you had a different way to add pattern or texture? Or, are you on a budget like I am and don't want to spend money on a fancy background stamp? Yeah. Been there.

So....this is what I do....I create something using whatever I have lying around.

For this I used jute twine and bubble wrap. Both subtle, but exactly what I needed to create a fun pattern for my ATCs. I used Americana acrylic paint in lieu of ink.


The houses are Stampotique, of course, and this time I broke out my Copic markers as well as my Prima markers. They blend well together, which is awesome! I love the whimsy of these houses and had a lot of fun imagining a color scheme for them. 


I added some doodled boarders and a couple of cute sentiment stickers to round off the whimsy. I am excited to swap these, but kind of sad to see them go as well. It is always hard to swap away something you like, but if you like it, then you know your partner will appreciate it as well. 

Did you know Stampotique also carries an ATC stamp for the back of all of your ATCs and it is delightful with its webs and skull spiders. Be sure to check it out! 
Ingredients:

Bubble Wrap
Jute Twine
Americana Acrylic Paint
Teresa Collins Sticker Sentiment
Copic Markers