Thursday, January 30, 2014

The Doctor Is In

So for Christmas, my amazing husband got me some more amazing Doctor Who socks. The trouble is, they are about  30...yes, that's right....THIRTY INCHES LONG! Holy cow! and they are only like 3 inches wide? And...apparently my legs are larger than that, haha.
I was so sad, then I decided it would be fun to make Doctor Who arm warmers out of them! And then I would have a pair of socks AND warmers! YAY!!!

This was literally a 5 minute project, guys. I put the socks on my arm, arranged them how I wanted them and then decided how far down to cut across. I put them back on after I cut them and then decided where I wanted the thumb holes.


Viola....arm warmers....Yes. Its literally that simple. However, I will go ahead and hem the thumb holes and the finger holes as well just to make them last longer. That, again, will take about 5 minutes.

Can't wait to wear them out. LOL I am the biggest NERD ever, lol. Enjoy!!


Tuesday, January 21, 2014

Stamp And Scrap Fest

I seriously can not believe how amazing life is going in 2014. Talk about starting with a bang! Ever since I started working for the Stamp Doctor Design Team my crafting life is finally starting to really develop.

I got the opportunity to fly to Houston, TX and not only work doing one of my biggest passions, but I also got to meet and stay with the amazing Lizzie!!!! Can you say, Trouble with a capitol T?!?!?! Bless Doc Mechele Rudd for putting up with our crazy selves.
Lizzie and Mechele made me feel so comfortable and so welcomed. 
The first day of work was all set up and learning what to do, but that didn't stop our crazy butts from having some fun too. Yay, umbrellas!
Did I mention we were up SUPER LATE trying to get classes and stuff done? Yeah...it was kinda nuts....THANK YOU STARBUCKS for single-handedly making our work possible!
Can you believe Mechele trusted us with sharp objects? Kind of amazing, right? 
Yeah, this happened too. Because...why not??? 
Oh, yea....this happened too....I case you were wondering? It totes works. 

So the third day, I had a class....man was I nervous that no one would sign up. By the time the class started, 9 out of the 10 slots were filled and we had a blast! I felt like I was doing exactly what I should be doing;teaching what I love. 
Look at my nerdy self teaching. Holy cow!
 So, Lizzie and I loved this lady. She was so sweet and so excited to be making her very first cards EVER. As someone that has been making cards and the like since I was my son's age, its hard for me to imagine life without cards and scrapping. I think this lady also found a love for it too!
Our cards we stayed up crazy late to prep for class/make-and-takes.

Dude....we were so tired....this was take-down night...and the night before I left. We were SO COLD and so tired, but still managed to laugh our rears off about literally nothing....and corn...
Wait....did I say we were tired? Nahhhhh....we still had time for a romp at Walmart to grab some goodies for our kiddos. And a feather boa...because...WHY NOT?
This picture makes me sad.....its hard to leave someone you connect with so easily. Sometimes you don't feel like you can connect in real life after "meeting" on the internet, but in this case we connected. Like, really connected. My house is so quiet now that I am home and not with Miss Lizz....
The entire trip seemed so natural and I really didn't want it to end....however, how could I stay away from this any longer? 
Glad to be home and see my two boys whom I missed VERY much, however I am eagerly awaiting March when I can hopefully repeat this amazing job in Arizona! Happy week, and stay warm, wherever you are...


Wednesday, January 15, 2014

Flip Floppin!

No, not for realz...it was literally ONE degree the other night...no flip flops on these toes. Nothing but warm, fuzzy socks!

No, by Flip Flop I am talking about this AMAZING (and super easy to use, I might add), Flip Flop Die (#2) that I got to play with. Omgoodness! I remember when I first got heavy into the online world of papercrafting I would literally measure and cut by hand to make flip flop, or swing cards. Took forever and one false move or measurement and that card was toast and I had to start over.

These flip flop dies from The Stamp Doctor are AMAZING! And they are made by Spellbinders so you know that quality is top notch. This link also sends you to a quick tutorial video on how to use the die once you get one. Cause I know you are going to want one.


The sentiments you see here are soon-to-be released from The Stamp Doctor along with a couple of other versatile sets. I really enjoyed playing with them! Did I mention they are formulated to go perfectly with labels 18 and the flip flop #2 die? Gotta love the Stamp Doctor! 
I used paper from Echo Park that was double-sided. I love the bright, cheerful florals. The sentiments were cut with spellbinders, labels 18, which the flip flop die is made to go with. Talk about awesome! Hope you are inspired and that this post brings some sunshine to your day! 


Monday, January 13, 2014

Build-A-Bear Sling

So, my best friend and her daughter took Noah to Build-A-Bear for his birthday. It was a pretty epic experience from what I heard. Noah came home with an Obi-Wan teddy that be babies. He got a gift card and with it he got a set of PJs, shoes and roller skates. Obi Wan is killin it!

As soon as Noah got his bear he asked me to make a backpack of some sort in order to carry him around. I have NEVER been good at bags and the like so a back-pack scared me a bit. I am going to be honest...I made a lot of excuses about time, and materials....its been a month and I am just now getting around to it.  

I sat with Noah and looked at different things and he decided on a sling-type carrier. (Insert sigh of relief here). MUCH easier than a backpack.

I did a lot of measuring and a lot of math...See? Scary stuff. Just sayin....Anyway. Here is what we came up with. A couple of hours and viola. Bear sling.


Nothing fancy. No frills. It is reversible so he can wear it around the front as well and it is also adjustable for clothing and growing. Cause....he can't friggen quit growing. 

If you are interested, I basically took the same idea as an apron top. The arm holes are 3.75 inches (sloped like the top of an apron. The top of the sling is 6 inches. From the arm hole to the bottom of the sling measures 9.25 inches. The bottom width is 13 inches. Make sure that you add seam allowances. 

The straps for the arms were 3 inches 20.5 inches. You need 2. Then you will fold in half and sew that puppy up. Make sure that you add seam allowances. 

The straps for the bottom are 3 inches by 11.25 inches. You need 2. Then you will fold in half and sew that puppy up. 

The strap you see in the first photo across his chest is 14 inches long. You will wrap the left side around the arm strap and secure. I sewed a square to secure it around the strap. 

The other side of the strap will need velcro. You want this strap to also wrap around the right arm strap. You will also sew velcro to the arm strap. The chest strap will wrap around the back of the arm strap and secure to the front of the arm strap with velcro. 

Then, of course, if you are backing it to make it reversible as I did you will want to sew the 2 sling panels right sides together and leave a space to turn it right side out. Once you turn it right side out you will then iron and top stitch everything, including closing the hole you left to turn it right side out. 

Obviously, I should have taken photos but I was winging it so I just thought you would want to know the final outcome. Haha. 

You also will want to consider the size of your child. The 13 inches came from Noah's arm pit to arm pit measurements. 

Hope all of this make since, and if it doesn't, that's okay. You can feel free to hit me up and ask whatever didn't make since. 

Happy Monday!!


Sunday, January 12, 2014

New year, new apron!

Yes, its another apron. A VERY girly apron. A dear friend of mine's daughter is having a birthday party next month and the theme is baking. Apparently she has really taken a liking to baking cupcakes and the like. You GO  girl! 7 years old and baking like a pro!

So, for her birthday I picked up some neat cupcake kits and sprinkles and batter spoons and the like...but of course, you know my unhealthy obsession with aprons well enough by now to know I was not going to let an opportunity like this pass my by.

Once again, I dug out all of my remnants from the last couple of years and found this ADORABLE girly fabric that was too girly for myself but perfect for a little girl turning 8.

It felt SO GOOD to be sewing again. This apron exceeded my expectations after yesterday's sewing debacle. The apron went off without a hitch. I didn't even pull out my seam ripper. Can you believe it?
Also, I must be learning something because I managed to put the pleat/ruffles on BEFORE the backing and it turned out correctly! What!??! Awesome!
I feel totally happy after making this apron. Can't wait to give it to the little girl it was made for! Hope you all are having a great weekend! Its sunny and warm here in TN. Such a change from last week! Enjoy the rest of your Sunday! 


Saturday, January 11, 2014

Texas Bound!

So,you may or may not know, but I am headed to Texas on Thursday night to go and work at a really great convention for The Stamp Doctor...but the best part is getting to hang out with the one and only LIZZIE for 4 days!! I seriously and stoked, excited, scared, dorked, and so many other things all at once. Gonna work our tushies off but we are going to have a blast!

So, I have been preparing for the trip. Making lists, packing, and creating. The latest things I have created are these luggage tags and a lanyard.

A couple of you might remember this apron from a few years back.
Do you see that fun, poppin fabric? I was hoping and hoping that I would have some leftover fabric and I DID! I couldn't believe it! Digging through all of my fabric I had enough to make some fun stuff for my trip! And now, I have a lanyard that matches the apron so I am all matchie and stuff! And yes, the apron is going to Texas as well. .YAY Please excuse the cell phone picture. Its night...its dark...and I live in a cave....
So, I made these adorable luggage tags as well. I was disappointed in the tutorials I found on pinterest this time around. They were all so overly complex with 4-5 sheets of fabric and fusible interfacing and blah, blah...I don't travel. Like...ever....I am thinking...at some point I will more? But I am not going to spend hours on one stinking luggage tag. Sorry. Too lazy. So, after a failed attempt at making one by the tutorials, I came up with my own. Because, why not? Its shabby, but cute...and it matches my stuff. All I need to be happy. 

So, here is how I did it. First, I cut a rectangle from 2 prints of fabric (so 2 rectangles) and another rectangle from interfacing (I just have the cheap kind, not the fancy kind) the same size. I didn't measure. This was all winging it. Nothing by-the-book.
 Next I layered them as follows: The bottom layer is your interfacing. Then you put the two printed fabrics right side facing one another. Both are on top of the interfacing. The interfacing is going to give your tag structure.
Sew the layers together leaving one side unsewn. You have to be able to add stuff and turn it right side out. So sew 3 sides of the rectangle. The side that you leave unsewn will be the top of your luggage tag. 
 Here is what it will look like once you have turned it right-side-out. Here is the top. You will want to fold the ends in and iron them flat to hide the raw edges.
Stick your elastic strip ends into the top of the tag. Sew that bad boy up!
 Now comes the tricky part. OKay. So, you want to cut a piece of vinyl/plastic....I used the kind that comes on the cover of a Smash*book. The protector. Anyway, cut it down the size you want, then mark the inside of what is going to be the front of your luggage tag. Right now, that will be the bottom. Cut a rectangle smaller than the markings and then cut the corners diagonally. NOT all the way to the markings, but about a half inch or so in from the markings.
Okay, so I am not sure how well you can see this next picture, but it shows you how I folded back the edges of the rectangle you just cut and then I ironed them flat. I placed the plastic on top of the ironed edges. I didn't pin the plastic down because when I tried it messed the plastic up. It was a lot of trouble. It was a lot easier to just sew one side at a time and hold it tight with  both hands. 
 Sew the rectangle as close to the inside edge of the window as you can with proper allowances. This ensures that all 3 layers of your ironed fabric get sewn securely.
Now all that is left to do is to fold it in half and stop stitch 3 of the 4 edges. Remember, you need a pocket to slip your information into. I went around the edges 2 times. Once each direction. 
 Now stitch around the window. This will keep your information snug inside.
 After I saw how really rough the tag was looking I decided to do crazy stitching free-hand everywhere to make it fun. Swirls, zig zags and all kinda fun crazy stuff on the edges.
Anyway, that's about it. Not too bad. Nothing complicated. 

I am totally stoked and ready to go to Texas. T Minus 4 Days, and counting. 


Wednesday, January 8, 2014

Just dropping in...

So my pledge to myself this year is to be on the ball.  By the end of 2013 I was so behind that I was close to not even bothering anymore. I seriously can't stand being disorganized. Do you know what its like to have diagnosed ADD, and also have OCD? Among a couple of other of issues. But those are moot.

So seriously. I plan to make Christmas cards every month and I am already done with Valentines day. Other than the baking for the teachers; and obviously I can't do that until the week of.

So I love pinterest, obviously, and I seriously love no-candy treats for the kiddies. I mean seriously. I love smarties and sweet hearts as much as the next gal, but how much can the kids bring home every holiday? Especially when you start factoring in children with allergies.

So I asked my son which valentine he wanted to do on pinterest and he chose these adorable paratrooper valentines.  Supermommoments added a link to her free printables, which I thought was SUPER for sure! I like her blog. Lots of yummy moments!

Noah and I canvassed our town and no one had any paratroopers. I was bummed...until I checked out Oriental Trading. They had exactly what I needed. I needed just under 2 dozen and I got 2 dozen for 12 dollars, which is about as cheap as I could find online. AND free shipping. Totally worth it not to have to drive all over creation. Added bonus is that these are larger than the ones she used and they seem to be a bit better quality as well.

So, here they are! All finished and purty! Ready for Valentines Day. I did take the troopers out of the bags they came in. They were individually bagged which was awesome, but the tops of the baggies were larger than the print-out so I used jewelry baggies from pretty much any craft store and stapled the tops to the bags. The guys were a tad large, but they just fit.


I hope that Noah's classmates love them. Noah sure does! What are you doing for valentines for your classrooms this year? 

Sunday, January 5, 2014

Trust In Miracles

Back in business after a long holiday break that looks to be extending thanks to Mother Nature. If she has her way we may not see school again until Wednesday here in TN. That being said we are very lucky compared to those who are living up North.

I have a cheerful card for you today. I made this card for the Stamp Doctor using the Cornflower Fairy. I love the butterflies and fairies the Stamp Doctor Carries. I had a lot of fun coloring her.


I used paper from the Simple Stories paper pack, "Vintage Bliss". I am IN LOVE with this paper pack. Omgoodness. I will cry when I finish the pack. Did you know the Doctor also sells Washi Tape? Yeah, the wood and flowers on the bottom right are also from the Stamp Doctor. I love the quality. Its legit Washi, not that strange plastic tape. 

I had a lot of fun making this card and I hope that it brings a bright spot to your day! Happiest New Year! 

Thursday, January 2, 2014

Winner, winner, chicken dinner!

Why do we say that? Who cares about chicken dinner? Is that just me? I want blog candy! Just sayin.... Anyway, without making you wait any longer, the winner of my 12 Days of Craftmas goodies is Emily!!!

MANY congratulations and I hope you enjoy all of the goodies! Hope you all enjoyed our hop and if you missed it but still want to see what all of the fuss was about, check it out!

Emily, just a reminder of what you won!


Happy new year to you all!!


Wednesday, January 1, 2014

Top Ten For 2013

So this year was a whirl-wind, but SO long at times! I seriously can't believe its already JANUARY. What's up with that? I turned 30 this year. I am not going to lie, I was a bit depressed about the prospects of 30 and not having done anything truly wild in my 20s. However, 30 has been pretty good to me, and the year 2014 is looking brighter than I could have imagined!

I want to share with you my top ten crafty moments of 2013 because, lets face it, I live to craft. I get so grouchy when I don't. In 2013 I did my best to try new things, but also got back into some of my old loves as well. 

These moments are in no real order, mainly because its hard to say which ones I like best because my heart is in everything I do. So, here we go!

This project was my final project for the year. The backdrop for my son's 7th birthday party. A MARIO party, if you can't tell. It took 4 days of painstakingly drawing and measuring and painting, but the final product was beyond anything I could have imagined!
 This project, I actually did not once, but twice. I created Hunger Games shirt for myself, and another for my best friend. We both just recently (FINALLY) got to watch the second installment, Catching Fire and it lived up to my expectations, which is a hard sell since I am VERY much against how movie writers can change the vision of a book. Anyway, it's a stencil and a tee, spray some bleach and awesome mocking jay for any "girl on fire".
 THIS project took up many weeks and months of my time. Not the project itself, per say, but the FINDING of the correct product! I transformed a game of Guess Who? into a game of DOCTOR who!! Thank you PINTEREST. I obsessed, checked Ebay, checked every thrift store and asked everyone I knew to help me find one and I FINALLY found one! Painted, printed, cut and POOF! Awesome, 1 of a kind game!


These pen flowers I spent half a day making after my friend Lizzie posted a tutorial on her blog. They were SO FUN to make! They really cheered me up, and they made great gifts too! 

 I made an apron! Oh, geebz, I KNOW, I KNOW....I make aprons. Its what I do! What made this one special was that it was vintage fabric that I found at a yard sale in an old ladies basement. The lace was too. What an adventure that day was!
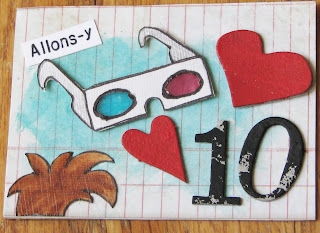
 I made ATCs! I re-discovered how fun they are to make. I made these all from my own inspiration, by hand. Hand-made the glasses, the hair and the TARDIS stamp and K-9 stamp were also hand made stamps, but you will see those further down. These cards made me so happy. I am in the process of making a Doctor Who smash*-style book. These are going in it. :)


 I made a pillow! Its actually been a year or two since I made one. This one was special. I saw a similar design on Pinterest...(where else?) and had to make one. Its a tooth fairy pillow. I had it for Noah for months and he FINALLY lost his teeth...well, 2 of them, anyway. The mouth is a pocket for the teeth and the gold coins. The image is applique, and this was my first time ever attempting it!
 I made an Eskimo costume! Out of a woman's jacket, no less. It was a crazy day making this thing but it was a big hit at Noah's social studies fair last school year! Noah loved it too.
 Stamps! I made lots of stamps! I love making stamps from erasers. I made 3-d glasses (Doctor WHO reference!) and lots of patterns and a paper airplane! Loved making a card with the paper airplane, and the 3-d glasses stamp I used on the ATC you saw above. Yay, cheap stamps!

Smash*ing. See that book on the left? My 365 Smash*book. Kind of a big deal. Its almost complete. I am hoping to finish it in the next 2 weeks and get started on the NEXT big one! 
A couple samples of the inside. 
I hope this year is as inspiring as the last. I can't wait to see what 2014 holds for me! Happy NEW YEAR!