Tuesday, September 30, 2014

Halloween Tricks and Treats

So, this year I wanted to do a non sweet treat for Noah's class for Halloween. In the past he has attended schools that didn't celebrate but this year he is, so I am excited to get to send treats to school. Not sure why I love sending treats for the different holidays, but I do.

I found these multi-packs of play doh in the halloween section at Kroger and I knew they were just the ticket. I grabbed some halloween Washi tape from Target today and wrapped them to cover the label. I found some free printable bottle caps on pinterest and then cut them with my cuttlebug and hot glued them to the lid for extra flair.


It took maybe 20 minutes to complete once I found the printables. Super fun treat for any little trickster. Hope that you are inspired to get hoppin on your own little one's tricks and treats! Happy crafting!

Monday, September 29, 2014

Playing With Paper

Its been so long since I have just sat and mindlessly made cards. It was so much fun to sit down yesterday and do just that. I pulled out some scraps and got to work. I love how each and every one of these cards turned out.

I have found myself lacking in generic greeting cards as of late so when the opportunity arose for me to create some, I jumped at it! All of the papers used are scrap that I had from who knows when. All brands, all textures. The twine is Jilly Bean Soup.

 This stamp is from Stampin Up! I have had it a LONG time and rarely have the chance to use it.
 This stamp was a 1 dollar stamp from Walmart last year. I think it pops with these papers!
 The sentiment here was cut out of a piece of cardstock that had several quotes and some ledger type designs on it. I think it was perfect for these vintage tulips.
 This stamp was given to me a long time ago used so I am not sure where it came from, but the sentiment is wonderful and I hope it will make someone smile.

I love the shabby feel, and I love the simplicity that allows the greetings to shine. I hope to be back later this week with an announcement, but first...I have housework to catch up on, so stay tuned!

Hope you are inspired! Happy crafting!

Sunday, September 28, 2014

Christmas Already?

Well, no. Not quite yet. Though, I am already in full preparation mode. As always.

I mentioned in my last post that my husband and I stumbled onto a Hancock Fabric and I was super excited. I really don't like Joann Fabrics. Overpriced and not a lot of variety sometimes. Recently, I ordered some fabric from them and was told after I received my shipping notice that oops, they were out of the  fabric. Geee, thanks. Make my wait 2 weeks to tell me you are out.

SO. I checked out the massive remnant section and found some awesome Marvel fabric as well as some Angry Birds fabric that I will use on another project sometime.

Today, though, I am going to show you my Avengers fabric. I decided that my almost 8 year old needed something a little older than a Winnie The Pooh stocking. He says he still loves it, but I know he also loves super hero stuff.

So I made a lined and slightly padded stocking for my little/big man. I am still learning how to sew curves, so the toe looks a bit funny. You sew, you learn, right?

 I also had these fuzzy iron on letters and ironed his name onto the stocking. He especially likes that feature.
 This is the color I used to line the inside. Again, a learning process. I think I did the top wrong, but its all good. It turned out pretty nice when all was said and done.
 Now, all that is left to do is wait for the big fat man with the long white beard to come and fill it with goodies on Christmas Eve. This was pretty simple, all things considered. I created a pattern on some paper and then traced and cut out all of the parts. It wasn't overly difficult. Not bad or an hour or two of work.

Hope this inspires you to get going on your own Christmas items!! The time to prepare is NOW! Hahaha. Happy weekend!

Saturday, September 27, 2014

Bunting and Something "Old"

When I was in highschool (my junior year, I believe) I had the opportunity to go to MGM studios and Disney while I was on a trip. I had just discovered the Star Wars series a couple of years before so I bought 3 postcards while I was at the park.

Little did I realize, all these years later that I would be framing and matting them for my almost 8 year old boy's birthday party in December. I think they will be perfect additions to the party decor.

Last Tuesday, my husband and I happened to come across a Hancock Fabric store. Ours closed years ago, but apparently there is still one in Bowling Green, Ky. He suggested we check it out and I am so glad we did. I managed to come out with more Star Wars fabric, bias tape and some other fabrics that will be featured in other posts.

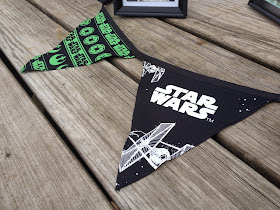
Today was the first actual day of my 2 week vacation from work, so I decided to start off with a bang. I made some bunting for Noah's birthday party (I may make more later) and I matted and framed my postcards for use as decorations on the tables. The frames are from the Dollar Tree and then I used scrap patterned paper for the mats.

I think both turned out pretty great! My first time making fabric bunting. It was pretty easy. I just created a stencil with cards stock and then used some allowances to create neat edging.


 Getting very excited to see how everything comes together on the day of the party. However, we are nervous that ALL the kids will show up that we invite, haha. It would be a blessing, and a curse.

Happy weekend and hope that you are inspired! 

Wednesday, September 24, 2014

Shabby Chic/Girly, Challenge #97 With The Southern Girls

So glad to be back with you for yet another Southern Girls Challenge! Yay! Can't wait to see what everyone shares with us, but for the moment, let me share mine with you.

For this challenge, one of the sponsors is the delightful Emerald Fairy stamp company. They are so stinking adorable and I had a blast coloring this one. I used my copic markers on her and added some glitter to her wings with a quickie glue pen.
I used papers from Teresa Collins. LOVE this stack. I used the layering to add more shabby-ness to it. I distressed the edges of some of the papers with scissors and memento ink. I went a little crazy with the sewing. It got away from me so I had to improvise. I think its still cute, though. Made it a little more shabby. ;) And you can't get much more girly than an adorable fairy day-dreaming?

I hope that you have fun playing along with this challenge! Can't wait to do my rounds and see all of the lovely submissions! Be sure to check out of the rest of the design team as well! All of there links are here on the left side of my page. Happy Crafting!

Sunday, September 21, 2014

Bubble Lightsabers!

So I think I mentioned awhile back that we are planning a star wars party for Noah. Its going to be epic...at least, I HOPE it will be. I had the chance to work on the bubble lightsabers this weekend.

I managed to find a WHOLE bunch of these bubble wands at walmart for 50 cents a piece right before school started. I bought as many as I could imagine needing. The colors were limited, but I am NOT complaining! Going to be a great, non "sit around and take up space" party favor!!
To paint the handles I grabbed rust-oleum. MAN does this stuff work well! Talk about good coverage! Def pays to buy the "good" stuff. I will never buy cheap spray paint again!!
I also grabbed a box from work and cut slits in the top to shove the wand portion of the bubble wands into the box for protection from the paint. I only wanted to paint the handles, not the colored part. I now realize that I didn't consider the slit down the CENTER of the bottom of the box so there was a bit of over-spray on some of the sabers but I really don't think it will matter. They look awesome. That paint is SHINY!!!


 And, after dry time, VIOLA!!! I have lightsaber bubble wands! The first goody for their goody bags! This is seriously going to be a fun party! Now, to get the rest of my fabric so I can make bunting!
Have a great week and be inspired!!

Saturday, September 20, 2014

Butterfly in the sky....

I can go twice as high! Okay, not really but this week at my son's school they are having a monarch butterfly release. It is a tradition there and they even sell t-shirts for the occasion. I, however, and too much of a cheapskate to buy a tshirt that will be worn for ONE day and be hidden beneath my apron at work. SO....I decided to make myself and the ladies I work with some hair clips to wear on the day of to celebrate.

Using various scrap paper I had (and by scrap I mean, tiny pieces that have been around for years) and a Spellbinders Shapabilitites set (s4-395) and just the smallest amount of hot glue and tulle I created some hair clips! It was super easy, I promise.

I would suggest that when using the more detailed spellbinders dies it is VERY useful to have a metal shim. Otherwise a lot of fine details are going to be lost and merely embossed instead of cut out.

I had a lot of fun making these. The paper that I unearthed was White Wash Core-D-Nations. Man I love me some core'dnation papers. They are never a disappointment. I also used some tulle from a yardsale last year and some left-over adhesive pearls that I have had for ages. However, I did use hot glue to really make sure they were going to stay put. 

The clips themselves came from Walmart in the sewing section. They have an entire hair bow accessory section. Much as I don't like Walmart, it is a necessary evil until the new Hobby Lobby opens 15 minutes from my house. (insert happy dance here)


And viola! Cute hair butterflies! I can't wait for Friday to wear them! I am such a kid when it comes to accessorizing. 


What are you working on this weekend? I am doing my best to do as little as possible today. This was my "me" time for the week. I am counting the days until this week is over. I get a 2 week vacation from work! WOO! Thank you, Fall break! 

Sunday, September 14, 2014

A baby shower, and a winner!

First things first....the winners from the comment list on the last post were....number 2, LISA DEAN and number 6, STEPH ACKERMAN!!! Steph, I have given your names to Kimm and she will help you with your stamps! Congratulations! So happy for you both!!!!

Now, for the other business. I posted here awhile back that I was making things for a baby shower. While I didn't actually attend said baby shower, I did help set up. It was a VERY simple affair, but it was appropriate in this case, I think.

This was the food table. They had casserole and other things. I put a few pearls into the flower balls (one of the balls was leaning). I used cloud confetti that I had punched with the fiskars punch to scatter around.

Yay, mason jars! Used them for the paper straws and the mints. No one ate the mints OR used the straws, however. I find that strange.
All of my cute little plasticware bundles ready to be used. 
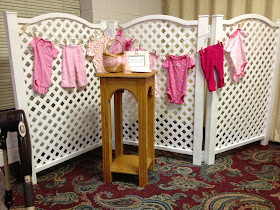
The "wishes for baby, advice for mum" table. They were to write on the card and place it in the basket. It was against a backdrop of cute baby clothes and lattice. 
 Isn't it adorable? I totally dug the lattice fencing and the baby clothes on a clothesline. Super cute!
Let it shower! I dearly wish I had made the cloud at least 3 times the size it was. I will know better for next time. It is dwarfed by the size of the room. Also, I might should have put the rag line over on the left behind the mother's chair to balance the lattice. 

 Yes, the rag line would have gone nicely over here near the mom's chair. Also, the umbrella may could have been hung differently. It was LATE at night and we were all tired. So....this is how it happened.

 Given the circumstances I believe it turned out well. Do I wish I had planned better? Yes, however it wasn't a shower I was throwing. I was just creating. So, all in all it was great. I was thankful for the opportunity to get to create something I haven't gotten to dabble in before.

Again, I want to congratulate Lisa and Steph on their big win! Be sure to contact Kimm to receive your prizes! Also, be sure to "like" Ms. Kimm Creates on facebook! Just follow the link!

Happy crafting!

Sunday, September 7, 2014

Christmas In September

Yesterday, Kristy and I got together and made Christmas cards. got a GREAT start on my Christmas cards for the season! We had Mega Stuff Oreos and MAN were they good! Good brain food!!


Usually I over-think my Christmas cards. And that's a bad thing to do when you have SO MANY to make. Kristy and I got our heads together, did some pinteresting and decided on some simple, but punchy washi tape Christmas cards. MAN I love em! I can't wait to mail them out! I need to make more, but it is completely NOT overwhelming this year now that I have allowed myself the freedom to make a CAS card. 

The stamps used on these cards are made by one of my friends, Ms. Kimm over at Ms. Kimm Creates. December 25 and Dear Santa came from the "Dear Santa" set. I am in love with these stamps! The quality is amazing for clear stamps. So crisp! And the sentiments are flipping awesome. The tapes are mostly Recollections and the twine came from the gift wrap section at Target. 


 This stamp is an old Stampin Up! stamp that I have had for ages. I also embossed a border stamp from Ms. Kimms Creations, "Dear Santa". The stars are confetti/sequins from Joann.

 This card was made using a tag from the dollar spot at Target and some Holiday words from Tim Holtz. Oh, and Washi. And vellum.

This card was created with Recollections and Smash* brand washi tape and a stamp from the Christmas Tradition set over at Ms. Kimm Creates. I distressed the card with some gold leafing. I thought it made a neat statement.  

These next two are shaker cards. I haven't made shaker cards in years and I learned quite a bit in the process yesterday. This first one was a minor failure. The foam I used wasn't quite as thick as I had hoped so when I added the veneers and the confetti, it didn't want to shake. Also, something I didn't account for is the stickiness of the edges of the foam. This caused a bunch of the shaker items to get stuck to the edges and not shake. Lesson learned, though! the stamp is from the set, "Lovely As A Tree" from Stampin Up!. The frame is from Jilly Bean Soup and the paper is Paper Studio. 
This last shaker was a success. I learned from the mistakes made this shaker card with Ms. Kimms set, Dear Santa.  Before I put the shaker onto the card I took microfine glitter and shook it around to coat the sides of the foam so that it was no longer sticky. then I added all of the extra glitter and sequins. I also doubled up the foam to make it slightly less flat. It shakes like a dream. 

I really love the stamps over at Ms. Kimms Creations. In fact, I love them so much that I decided to do a give-away! Ms. Kimm has generously decided to give away two of her Christmas sets!!! 2 lucky winners will receive one of her adorable Christmas sets!!! All you have to do is leave a comment below and September 14th I will choose 1 winner for each set using Random.org. Make sure to leave me an email address so that I can contact you if you win!!! 

Hope you are uber inspired and good luck! And don't forget to check back and see if YOU were one of the lucky winners!!!

*THIS GIVEAWAY IS OPEN ONLY TO THE UNITED STATES AND CANADA. THANK YOU!

Monday, September 1, 2014

Zap, POW!

Its that time again! Lizzie and I have a new release and we are totally stoked to share it with you! So, I wanted to share some projects that I did using our images. I had SO much fun coloring and playing with these.

One of the best things, I think, about creating with something that came out of your mind is how gratifying it is when it turns out as good, or better than your original imagined thought.

So, of COURSE I had to draw some MORE coffee. I mean, seriously. I chose vivid colors. Had to be BRIGHT eyed and bushy tailed!
 Now, this little guy...my baby optimistic Optimus. I love him so much. I had a blast creating him and then coloring him to bring him to life. Makes me "optimistic". Hehehe. OKay, that was lame, but I still LOVE this card and love my baby Optimus!

With Lizzie's images, I created these cards. I love working with someone whose work I believe in and love to work with!! Like, seriously, a CUPCAKE of tea? Come ON! How "sweet" is that!! I had so much fun coloring this up and creating this card. So cute, I could eat it up!
 And then there is this sweet dress form. I loved it the moment she drew it and HAD to color it up and create with it! Even had some Maya Road measuring tape ribbon/trim that totes matched!

Since we just released, we are having a tag/comment contest and will choose one random commenter to win 3 of our freshest images. You can hop over to our FB page for all of the information. It will end September 2nd at 11 am CST so don't wait!

Also, be sure to check out our shop. We have our entire release up and ready for you to create with!

Thanks for stopping by! Happy crafting!