Thursday, August 29, 2013

Coloring With Mama Cass...

And some challenges. I have been a busy lady today. Noah is back in school, so mama got the supplies out. Woot!

Designed To Color  has this really great photo inspiration challenge, and so did Cupcake Inspirations. Designed to color had a soft, shabby look to it and I LOVE making cards like that..and this Tiddly Ink image was perfect as well! She is also a Back-To-School image, which, makes it PERFECT for the Cupcake Inspirations challenge. Cupcake inspirations also had text so I used an old dictionary for that part. The greens and reds really popped out at me, so I made sure I chose papers and markers that brought those colors out. Esp the green.

Here are the markers I used:

Here is the video of the coloring process:


And NEW this week, is a step-by-step of how I made this card! So fun! Please excuse the shaky hands (coffee) and the strange crackles in my voice...getting over the cold from...you know. You are just lucky I didn't blow my nose! Haha!
Hope this inspires you to get crafty! Hugs, and see you soon!


Monday, August 26, 2013

Just one more

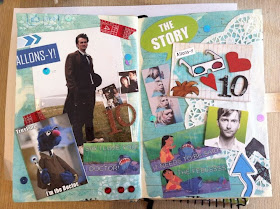
Once I got started on my Doctor Who book, I wanted to do another page. This cold and brain fog weren't doing much good for my creative spark, but I couldn't help it. I am excited about how this book is going to turn out.


Once I got going, this spread turned out better than I had thought it would, all things considered. 

I used Tim Holtz ink on the background of the second one. I used a Tim Holtz ink dauber thingie to spread matching stickles to create a cool background. Having lots of fun with my paint and inks. 

I also used 2 ATC s that I made recently. I can't bring myself to send them away. I need to make some doubles. 

Don't forget to check out my DIY video on youtube for the first spread! 

I stole a timelord and ran away...

So, for a long while I have been itching to start on my Doctor Who Smash*-type book but so far, haven't been brave enough to muster it. This morning, I decided it was TIME!

Time to get started, and TIME to make a new Youtube Channel! Woo! Be sure to join, cause there will be lots more yummy fun coming soon!


Here is the finished product with my TARDIS pics, an ATC I made with my home made TARDIS stamp and some fun sequins. I used Modge Podge to affix them. I also ended up finally  using the bubble wrap on the right page on the bottom. It added the perfect texture.  I will be adding some journaling, but I need to find my pen! 
I really enjoyed this project. If you make your own swirly, twirly background feel free to share! I want to see!! Happy painting!

Saturday, August 24, 2013

Happy Pockets

The other week, my husband brought home some wine in these neat, long paper bags. I was so excited! Not about the wine...but about the bags. Haha. I begged him to let me have them. I could see pockets for Smash*booking!
So, this afternoon I set to work on making some shabby/cute pocket baggies for my Smash*books.

I cut each bag into either 3 or 4 sections, depending on what size I wanted, but most ended up being around 4 inches tall. Some a little larger.

I cut the front section down by about an inch and then trimmed the lower front edge and the back edge to mimic the original top of the bag with zig zag scissors.
For the sections that had no bottom, I added a strip of strong adhesive to the inside bottom edge and adhered it shut.  
Then, I got to work stamping and playing. I used the stamps that I made out of erasers. Check out that post here. I have been itching to use them for a sweet project! 


I used mostly Versa brand inks. Petunia, Tea Leaves, and Tuxedo. I also used Memories White Dye Ink as well as a multicolored Ranger Pigment pad (gold and silver). I think I will def be investing in a new white pad, as well as some gold and silver ink not in a multi-color pad so that it is easier to use. 


I am super excited with the results and can't wait to start using them! I still have a few more to make, but it will have to wait until another day. This mama is sick and needs to go hang out on the couch for a few. Not anything too bad. Just a cold. Second week of school and the germs are already flying. Going to be a great year! ::insert eye roll here:: 

Happy weekend, one and all!


Back Bleachin

So, a dear friend of mine who loves The Hunger Games as much as I do asked me to make her a shirt like the one I made here.

Yesterday, I finally found my adhesive and worked on it for her. Her shirt is black, so the bleached out areas really do remind me of fire. We all know that fire is catching.

I hope she loves it. We are trying to work it out to see the premier together in November. Then we can be twinkies with our awesome shirtage! 

Wednesday, August 21, 2013

Guess WHO?

WHO are you? The 10th Doctor? The Red Eyed Ood? Perhaps Idris/TARDIS?

I am seriously geeking out. I have spent so much time combing stores and the internet looking for an affordable Guess Who game that wasn't chunky and new.
I found this super sweet tutorial on pinterest and, of course, have done nothing but obsess to the point of almost complete and utter insanity? LoL I am seriously as super excited as she is, haha. And she is pretty flipping excited!

I stripped down the boards last night and started painting. In hind sight, I should have sanded them, but when I am manic and excited, its really hard to slow down!


Since I was unable to find the model from 1986, I decided that in place of the pegs/sonics she has, I made the question mark red in honor of the 7th Doctor's umbrella. Figured it worked.  
I did seal mine with a spray sealer that my husband had on hand just to help prolong the paint with all of the wear it will receive. 

 After almost running out of ink in the printer, and realizing that the cards were too big and sizing them down, here is the final product. I am so happy with the result. Super excited to play with my son when he gets home from school. He is so awesome. He was humming the theme song while he was playing yesterday.


And viola! I hope you enjoy and DO check out the link I posted above! She has all of the printables and all of the tips and fun stuff on her page!


Saturday, August 17, 2013

Smash*n Again

You know I loves me some Smash*in. Have you checked out our awesome group on Facebook?

I got to go see my good crafty friend, Heather and got 3 pages smash*ed. We also got to go thrift shopping. Total win. A nice end to a good week.


I did 2 pages for August, and still have one more to go, but I made good progress. Ironically, I smash*ed about the last time I hung out with Heather. Hehe. These 2 pages are in my 365 Smash*book.
 I also Smash*ed in my Black Mod Smash*book. I did a page of Catching Fire. I know there will be differences from the book, but Catching Fire is my favorite of the Hunger Games trilogy and I am eagerly awaiting the newest movie in November.

I also bought a new shirt from TeeFury the other week. Now I am torn. Which shirt to wear to the movie? ::sigh:: 

This is the one that I made awhile back: 
Hoping to get to craft some more tomorrow. 

Sunday, August 11, 2013

One Smart Cookie

So, this year, Noah has a man for a teacher, which, I am THRILLED about. If it weren't for the fact that I miss his old teacher terribly and she is just in the next class room...AND...he's a man...so it makes it more difficult to find things to make for Teacher Appreciation. I dunno how he would respond to a flower pen or stationary? I dunno. lol

So I did a bunch of pinteresting this last week or so and found some great ideas that will not be just left sitting around or leave either of us feeling odd because its so girly. Haha.

So, I really dug the idea for "one smart cookie" that I saw all over pinterest. I snagged an image of a Snorg Tee. (I am hoping they don't mind since its just one print...from my printer...for a cookie jar...not for sale...)

Then, I used Paint.net (which is a free photo editing software that is free...) and whipped up this lil taggie:


Then, I filled a jar from the Dollar Tree with some Pepridge Farm oatmeal raisen cookies. MAN are those good. Its been forevers since I have had one of their cookies, and those are good. What? Its not my fault one fell apart before it got into the jar! (insert sheepish grin here).
Anyhow, I wanted a little more pop, so I added a couple paper circles to the top. Nothing fancy, but with that and some Jute that I had, it all came together nicely. I am sure that after tomorrow Noah's teacher will need some cookies! Haha! 
Happy school year to you all! I know some of you have been in school a week or more. Noah's school started super late for whatever reason this year. Oh, well. We enjoyed our summer so it wasn't much of a stress to us. Hope you enjoy!

Wednesday, August 7, 2013

Just one more

Srsly...last one for a few days at least. I sat down to start putting my craft supplies away and "had" to do one more page. Srsly. Couldn't stop myself. It had to be done. I am going through my new fancy paper at an astonishing rate. I might cry when it is done, but I never realized how fresh perspective and new paper could kick me into gear again.

Noah's 6th year book is finally coming together and shortly after school begins I hope to be caught up! I have another crafty day scheduled with the fabulous Heather and am hoping I can get caught up then!

The papers I used were from Studio Calico, and the "summertime" quote was a freebie  I found on Pinterest. The Thickers were "Amy Tangerine". Hope you enjoy! I know I am!

Playing Catch Up

I feel like I am on a blogging fury this week! Lady inspiration has been good to me. I managed to get one more page for Noah's 6th year scrapbook done this afternoon while Noah water colored and we listened to Pandora. My, what a change today has been. My heart is full.

So anyway, some of you know my son loves skateboarding. He's not superhuman, but he is good. He does way better than I ever could. This page is done about a park we visited right after school ended to kick the summer off the right way.

I used papers from My Mind's Eye and Crate Paper. The line of My Mind's Eye is called, Boy Crazy and I loved everything they had. Stinking craft convention...I also used genuine Polaroids that I found at a goodwill still in the package ages ago. LOVE finds like that. 

Hope you are having a scrappy week!  

"On Your Birthday"

Today, I managed to do a 2 challenge card. I recently got some new Tiddly Inks images and was excited to color up one of my new ones. Also, excited to get into another sketch challenge...Its been too long! the Sketchy Challenges had a great sketch this week so I dove right in this morning!

This week, Tiddly Inks is having a "birthday bash" challenge. So I combined this cute image and birthday sentiment with The Sketchy Challenges' fabulous sketch and came up with this card!


I hope it makes you feel happy. Makes me happy. I love these papers from "Crate Paper" that I bought on my craft convention excursion. I used copics to color the Tiddly Ink image. Copics used are: 

Bows and Umbrella: G03, BG10
Hat and Dress: RV11, R02
Hair: Y23, Y26
Middle Of Dress: BG10, BG72
Face: E00

Thanks for stopping by!

Tuesday, August 6, 2013

Creepy...but cute!

I love Dilly Beans...and I love coloring..and making cards. Not all of you know this, but Card Making is where I got my start. Card making is where my heart lies...and its been too long since I have made a bunch of cards...

So, TODAY, I maded a CARD! Aren't you so proud? Well, I know I am! And this is one card I am not ashamed to show! (you know...vs just the image cause the card was so simple the other day?)

The theme for Dilly Beans' challenge this time around was to use an image to make something that was Creepy and Cute. I colored this image with Faber Castell pens/markers that I got at Target for under 3 bucks a pack. It was a steal. No joke. However, there is a learning curve to them compared to Copic. I think, that given my first time, this image isn't bad. I actually love it and have been saving it for something special!

I used very subdued tones with dark shading to achieve my "creepy" look. I think I succeeded. The charcoals and subdued fleshy pink, and the blue/gray smudging (with my free Tim Holtz ink stuffs from the convention). I think it makes it look dark and pensive.
Hope you enjoyed it! I sure enjoyed making it!

Bountiful Boquet

So, I went even more nuts with the flowers and by the end of the day I had 7 completed. I am so happy. They are so pretty, and I cant' wait to share the ones I made for others. I have several that I am going to give certain people in my life and I hope they make them happy too.

The tutorial is here: Done by the fantastic Lizzie...Oh, SNAP!


Hope this brightens your day! 

Monday, August 5, 2013

A garden of flowers

So, its been like...AGES since I have been inspired to craft. Like...craft craft, not just Smash*. This morning Lizzie (who, by the way is one of the most inspirational and talented people that I know) posted a link to a tutorial that she did on these fantastic paper flowers on ink pens....Omgosh....I HAD TO MAKE SOME!!

I was seriously geeking out. Actually went to the store and bought pens. That's how bad I wanted to make some.

I did learn that you have to use genuine Washi tape. None of the plastic-y stuff that doesn't stretch and move. It really doesn't hold the flower on and you need it to so that as it dries it doesn't fall off.  Also, a thinner pen is optimal. I bought Sharpie fine pens with the "no bleed" and they were a tad too fat so I struggled. I also bought papermate fine colored markers and they were the perfect size! I also figured out that glitter paper isn't worth the struggle. The blue flower looks great now, but it took ages to get it worked out and I am still not convinced it won't fall apart today. 


I also managed to make a very simple card last night for one of my husband's co-workers. He recently got married so I made him just a simple and sweet card...simple mainly because the image took up most of the card. Its been like at least a year since I have played with my House Mouse stamps. I was terrified to try copics with the fur, but I think all things considered it came out really well. Hope he and his wife enjoy!